This step-by-step tutorial will show you how to replace kitchen faucet by yourself in less than an hour with just a few simple tools!
Removing the old kitchen faucet is the most difficult part of the replacement process. Corroded pipes, difficult-to-reach nuts, and restricted access to fittings are some of the unforeseen issues that frequently arise. Otherwise, installing a new kitchen faucet is not at all difficult.
Keep reading and you will know how to remove and change your kitchen faucet, it is not so difficult as you image!
Table of Contents
How to Remove a Kitchen Faucet?
To install your brand-new faucet, you must first remove the old one. Here’s how!
Clear Out under the Sink
Clear out everything inside the sink cabinet first because you’re going to be laying on your back for a while. I used this as an opportunity to get rid of a lot of cleaning products that we had extras of or didn’t really need. After that, place an old towel over the cabinet’s bottom to prevent yourself from working while laying in chemical residue.
Turn Off the Water and Disconnect the Hose
To stop the water flow is the first thing you must do. Two pipes for hot and cold water with shutoff valves on the front or top should protrude from the wall. Normally, the left is hot and the right is cold.
The faucet and another location, such as a refrigerator, will both receive cold water if you have a single pipe with a splitter like this one. You only need to turn off the pipe that leads to the faucet, so follow each pipe’s path to identify the correct one. Until the knobs are firmly closed, turn them clockwise.
Disconnect the hose that leads to the faucet after turning the water off. To catch any water that leaks out, make sure to have a bucket on hand.
Loosen the Nut under the Faucet
Look at the connection between the faucet and the sink’s underside. A nut should secure a U-shaped brace to the sink. Spray it briefly with Liquid Wrench penetrating oil before attempting to wrestle it off. You won’t have to struggle with it for hours if you use this to help loosen the nut.
The majority of guides advise using a basin wrench to unscrew the nut, but I’ve never had great success with them. It’s so challenging to get it in the proper position because they frequently slip! I substitute this useful faucet wrench tool instead. Although it might cost a little more, it makes the job so. much. simpler!
With this tool, you can unscrew the nut directly from the front rather than from the side, which is a feature that makes it so beautiful. You can get right up to the nut and unscrew it because the hollow body fits around all of the faucet tubing.
Clean the Holes in the Sink
Pull out the faucet from the top once you’ve taken out that difficult nut. The filth underneath will make you queasy. Not mold, don’t worry—that is a broken black foam seal!
I used a putty knife to carefully remove the old foam seal that was stuck to the sink. The rest was eliminated using a Magic Eraser.
Now that the sink holes have been cleaned, it’s time to put the new kitchen faucet in place!
Read More: How to Fix a Leaking Kitchen Faucet?
How to Install a Kitchen Faucet?
After all the trouble of removing the old faucet, replacing it couldn’t have been simpler! Everything you need is included in this kit, and it can be put together quickly.
Install the Deck Plate (Optional)
Some faucets can be used with a kitchen sink that has three holes or just one hole. The extra holes, which are typically used for separate hot and cold temperature knobs, are covered by the deckplate that is included. You don’t need this piece if your sink only has one hole.
You don’t need to fuss with silicone or putty because the TiteSeal deckplate already has a seal in place. Even though the faucet may be loose right now, once it is installed, the entire unit is watertight.
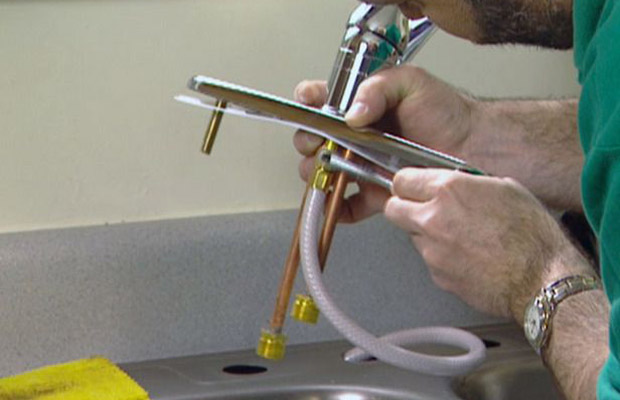
Drop the Faucet Tubes through the Hole
Take all the tubes that are protruding from the spout body’s bottom and drop them through the center hole. As you can see on the left, check to make sure the metal bracket is vertical.
Secure the Faucet to the Sink
Check under your sink to make sure the bracket is now horizontal once everything has been inserted through the hole.
Here’s the cool part: This model tightens from above, saving you the trouble of using a basin wrench or faucet wrench tool! Turn the faucet body clockwise after inserting the Pfister Top Pfit tool. It takes about a minute to raise that horizontal brace all the way to the sink’s base. When you start to experience tension, you are getting close.
Remove the tool from the faucet base once it is unable to turn any longer. Then, after lowering the hose through the faucet body from the faucet neck, click the neck into position.
Connect the Faucet Supply Lines
You can reuse the water lines you previously removed because they are all included with the Miri faucet.
Connect the black supply line to the cold water line on the right and the red supply line to the hot water line on the left. Before using an adjustable wrench to tighten the connections, I advise covering the threads with Teflon tape. Teflon tape should be applied correctly for a secure fit, as demonstrated in the video below.
Connect the Spray Head Line
The hot and cold water are combined and sent to the faucet together by the braided spray head line. Thread the end through the weight with a donut shape before connecting it. When you’re done using the sprayer, this weight will pull it back into place.
The braided spray head line should be connected with a click before the nut is tightened. To have the Top Pfit tool on hand in case you ever need to tighten or remove the faucet, you can clip it to the sprayer line or cold water line.
Test for Leaks
The faucet should be turned on and left running for about a minute to check for leaks. If any water is leaking, check all the connections to feel for it and tighten as necessary. Make sure everything is functioning properly by checking a few more times over the course of the following 48 hours. You’re done if it’s completely dry.
It’s not difficult to replace a kitchen faucet yourself, as you can see! Instead of hiring it out, you can purchase a gorgeous kitchen faucet like this one with the money you save!
Cleaning up is simple thanks to the pull-out nozzle, which clicks firmly back into place when you’re done using it.
What to Know Before You Install a Replacement Faucet
One of the simpler kitchen updates that many do-it-yourselfers can complete in an afternoon is replacing a kitchen faucet, but for the project to be successful, careful planning is essential. The project might prove to be easy if you replace an old faucet with one of the same kind. There are additional factors to take into account and carry out when installing a different style of kitchen faucet.
Knowing what to anticipate and what might go wrong will help you avoid common pitfalls and identify when it’s time to give up and call a plumber. However, before you learn how to replace a kitchen faucet, there are a few things to consider:
- What kind of faucet is being replaced? There are fewer opportunities for challenges when choosing the same type and configuration.
- Do you have prior experience working on plumbing projects? This might be a good project to try if you frequently do your own home improvement but have never worked on a plumbing project. It might be relatively simple. To hire a professional, though, if the project starts to get too big for you to handle on your own
- How long have you allotted? In the majority of homes, a kitchen faucet is a necessary component. Daily tasks could become more challenging if it isn’t functioning. If you don’t have enough time to finish the project entirely, postpone it until you do. This is not a task that can simply be put off and finished later.
Read More: How to Arrange Appliances on Kitchen Counter?
FAQs
Can I Replace Kitchen Faucet Myself?
You can replace a faucet yourself without having to hire a plumber. With a few simple tools, like a basin wrench, it ought to only take you under an hour. Kitchen and bathroom faucets are serviced using the same methods.
How Much Does It Cost to Replace a Kitchen Faucet Yourself?
Kitchen faucet replacement can cost a few hundred dollars if you already have a basic set of tools. If a drill or expensive faucet are required, the budget may increase.
How Much Will a Plumber Charge to Change a Faucet?
Expect to pay a plumber $150 or more for labor in addition to the cost of the faucet.
When Should I Replace My Kitchen Faucet?
If the faucet has been regularly cleaned and maintained, it can continue to function well for ten years or more. Mineral buildup and leaks may start to happen over time. If none of these problems can be resolved and the faucet isn’t functioning properly, it might be time to replace it.
How Do I Choose the Right Faucet?
When selecting the ideal faucet for your kitchen or bathroom, there are a few things to keep in mind.
Height
My old kitchen faucet’s shorter height was driving me crazy! Filling or washing them was quite a task, as it was too short to fit a large pot underneath. You can fit these larger items with more space if your kitchen faucet is taller.
I had the exact opposite issue in our upstairs bathroom though! I had to look for something much shorter than the standard height because the medicine cabinet couldn’t open with the tall faucet in place.
Finish
When deciding on a finish for your new faucet, take into account the room’s other metal furnishings. Pick a complementary color based on the cabinets’ door and drawer handles.
Consider how water stains and fingerprints will affect the faucet finish as well. For a longer-lasting clean appearance, some faucets have a spot-resistant coating.
Number of Holes in the Sink Deck
Before you go faucet shopping, take a look under your sink. There is a good chance that more than one hole is concealed underneath a deck plate that has been installed under the faucet neck. It’s better to be aware of your situation now in order to prevent any surprises during installation.
Related Reading: How To Choose A Kitchen Sink?
Final Thoughts
One of the simpler kitchen remodeling projects that do-it-yourselfers can complete to update their homes is learning how to replace a kitchen faucet. A cheap upgrade that can last a lifetime is changing your kitchen faucet.
It is simplest to replace a single-mount faucet with another single-mount. To switch from a single-mount to a double-mount faucet, holes must be made to fit the new fixture. It is also possible to convert a double-mount to a single-mount, but doing so necessitates the use of a base plate to conceal the holes that are no longer required.
For more kitchen tips, read our post on How To Accessorize A Kitchen Counter.