In this home, a wall was taken down to make the kitchen space larger. In order to avoid seeming overly connected or flowing together, it is crucial to establish a distinct division between each space in an open floor plan. Have you ever removed wall between kitchen and living room and what situation before and after?
A living room and kitchen can easily merge into one spacious area, giving the impression that you are moving from one enormous room into another. Discover the before and after of taking down the wall separating the kitchen from the living area. To more clearly separate the living area from the kitchen, we built a low wall that encloses the archway entrance. For those who are seated in the living room and those who are in the kitchen, the box-like enclosure creates a feeling of privacy.
Table of Contents
Should I Remove Wall Between Kitchen And Living Room?
We needed to make sure that the newly exposed brickwork could withstand normal use. We used a water-based sealant to cover all of the brick in order to address this issue. The actual application, which used a straightforward paint roller, only took a few minutes. This gives the exposed brick a good uniform gloss in addition to shielding it from spills that might occur often in a kitchen.
In order to replace this wall, the largest design challenge was to come up with something that would feel like it belonged there rather than just being thrown in. To avoid competing with other architectural elements or taking away from the lovely materiality of exposed brickwork, we chose a straightforward box enclosure. It does provide some much-needed storage for dining room decorations as well as cooking items, while also giving this freshly opened area a finishing touch.
How Much Would It Cost To Remove Wall Between Kitchen And Living Room?
- Cost To Remove A Wall That Is Load Bearing
The first step is to measure the floor plan and the walls that will need to be torn down. The cost to remove two dividing barriers will then be precisely estimated by a contractor. Below, we’ve included some details on typical prices for this kind of project for your convenience. Nevertheless, they could differ based on where you live. If your property has a non-load-bearing wall, it will normally cost between $300 and $1,000 to remove it. In contrast, it costs $1,200 to $3,000 to take down a load-bearing wall in a one-story house. For properties with multiple levels, the price rises from $3,200 to $10,000.
- Average Cost To Tear Down A Non-Load-Bearing Wall
Homeowners often spend between $300 and $1,000 to remove a non-load-bearing wall. The scale of the job, the conditions at the site, the number of services, and other factors should all be taken into account before removing the wall.
- Wall removal: DIY & Professional
The answer must be YES if you’re wondering if you could take down a wall by yourself. However, you must ascertain what is contained within each of the two walls and if either one or both are supporting walls. A professional’s knowledge is typically required to remove a wall. As a result, you still need to employ a specialist to help you with the procedure.
Remember that asbestos ceilings are often attached with glue rather than nails, so you may disassemble it on your own using a knife or chisel if you want to undertake the majority of the work yourself. If you decide to tackle it yourself, be prepared for several days of hard effort (and be aware of what you’re getting into).
Make sure to question the general contractor you select about expert bids. Once demolition begins, you’ll always need something else. Please don’t presume there won’t be any problems: Your final cost could increase by thousands of dollars due to concealed wiring or plumbing, perhaps making the project much more expensive than simply tearing down a plain wall would have been. Keep an open mind and let your contractor lead you through this process; if he receives payment for the work he completes rather than the one you first anticipated, he will consider himself lucky.
How to Remove Wall Between Kitchen And Living Room?
Start by determining whether the wall is load-bearing and coming up with a plan for supporting the house throughout demolition and construction as well as after.
- The Determination of Supporting Structures
The structural support of a load-bearing wall must be preserved throughout construction and changed out for a beam after work is finished.
Find a stud at least one foot away from any doorway with a stud finder to identify a supporting wall. At the very top of the wall, directly above the stud, remove a piece of drywall. If there are two horizontal 2x4s above the stud, the wall is load-bearing. The wall offers no support because there isn’t a top plate.
- Model Remodel Plan
In order to significantly transform the living room and kitchen space, two walls were eliminated in this sample project. The original beam and the new beam are supported by a new column where the two walls once met at a corner.
The two walls separating the kitchen from the living area can be removed to make room for a new peninsula counter or island that fosters a sense of openness for straightforward hosting. Visitors are welcome to sit on the new peninsula while you prepare food.
- Plumbing And Electricity
Switches should ideally be moved to a different wall before construction begins. When building a new island or counter, receptacles can be necessary. Plumbing installation in a wall is more of a challenge. Moving vent and water pipes is not too difficult, however, moving drain pipes is more challenging. If you don’t have a lot of plumbing experience, it might be best to hire a plumber to move the pipes for you.
- Temporary Assistance
Build a support structure out of 4×4 lumber about a foot from the supporting wall. Use a 24 for the bottom plate and a 44 for the top plate.
A nine-foot wall, for instance, would have a 44 at each end and two in the middle, three feet and six feet from one end. There would also be one at each end for every additional three feet of length. Build this support structure in place to ensure a tight fit.
- Taking Down the Wall
To prevent harming adjacent walls and ceilings, use a utility knife to cut corners and along seams in the ceiling. With a three-pound hammer, make horizontal holes in the drywall running the length of the wall.
With both hands, pull the drywall off the wall until most, if not all, of it has been taken off of both sides of the wall. Cut the top and bottom studs using a reciprocating saw, then take them out. From the floor and ceiling, remove the top and bottom plates, respectively.
- Set up Beam
Install the support beam if required. Although the building department code specifically states this in advance, the majority of beams will be supported by 24 studs at each end.
If the beam is not snug against the joists or rafters it supports, the floor or roof will sag. Nail three 2x4s together, one on each end.
Workers should hold the beam against the rafters or joists after attaching supports to each end of it. Make sure to obtain a beam’s approval from the building department before you begin construction.
Remove Wall Between Kitchen And Living Room Before And After
Between the kitchen and living area, space can be created by knocking down walls. The kitchen will feel cramped if it is enclosed by walls. Therefore, knocking down a few walls to create a larger, brighter living area between the kitchen and living room.
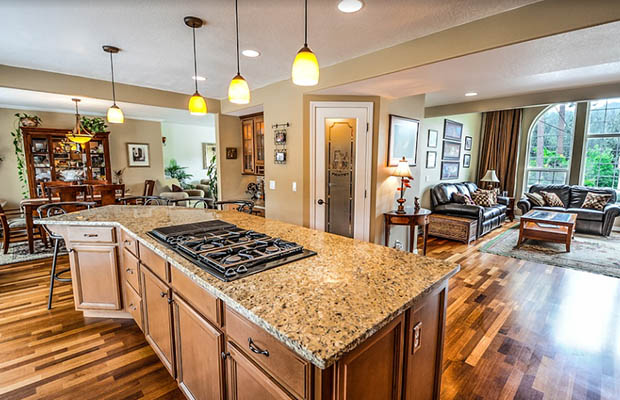
- L-shaped island counter in an open kitchen
You can arrange kitchen cupboards to make room for garbage compactors, microwaves, and dishwashers. Kitchen appliances like wall ovens that may not fit in existing cabinetry can be conveniently stored in appliance garages. Without taking up any additional floor space, built-in wine racks or corner shelves can also give a touch of elegance to the kitchen. To create a sense of space for convenient entertaining while still enabling traffic to flow around the room’s perimeter, try placing an L-shaped peninsula counter or island.
- The layout of cabinets in an open floorplan
Even if you need to alter a wall or other feature, plan your cabinets such that they form a straight line from your sink to the refrigerator. To ensure a smooth transition from room to room, cabinets should be evenly spaced apart and positioned in relation to the next cabinets. Allow 12′′ between base cabinets and 18′′ between top cabinets in general. Measure the distance from the corner cabinet where the two walls meet if you are building an L-shaped kitchen because there will be one continuous line of cabinetry leading into both living spaces.
- Set up a load-bearing beam
The load-bearing wall between the adjacent rooms should be removed and replaced with a beam to make the space more open. Additionally, this procedure simply needs a half-day or less. A floor or roof that sags is the direct result of the beam being loosely attached to the joists or rafters it supports. The beam can serve as both a structural replacement for the load-bearing wall and a decorative accent, giving the open area between the kitchen and living room a sense of organization.
- Lighting & electrical outlets in cabinets
Install under cabinet lighting above kitchen cabinets to bring interest and a welcoming ambiance. You won’t feel like you’re cooking in a cave when it’s dark since the light will reflect off the counters and shine into the neighboring living spaces. Run electrical outlets inside base cabinets to provide machines like blenders and slow cookers a place to live during meal preparation. This is a terrific way to preserve counter space. Visit Kitchen Ideas for additional information on designing your ideal kitchen.
The Bottle Line
Have you had a clear idea about removing wall between kitchen and living room now?
Don’t be afraid to combine several designs to create the ideal interior that is appropriate for your house. It all comes down to creating an environment that is cozy for you and your family.